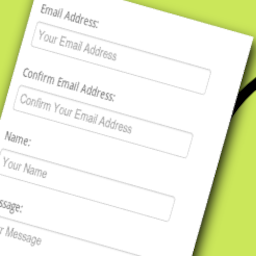
Contact Form Clean and Simple
A clean and simple AJAX contact form with Google reCAPTCHA, flexible CSS framework support, spam filtering, and REST API support for headless WordPress implementations. Clean: all user inputs are stripped in order to avoid cross-site scripting (XSS) vulnerabilities. Simple: AJAX enabled validation and submission for immediate response and guidance for your users (can be switched off). Flexible Styling: Choose your CSS framework – Bootstrap (default), Theme Native (inherits your theme’s styles), or Minimal (semantic classes for complete custom styling). REST API Support: Enable headless WordPress implementations to submit forms via authenticated REST API endpoints. Accessible: Built with accessibility in mind – proper ARIA attributes, keyboard navigation, screen reader support, and WCAG AA compliant color contrast. This is a straightforward contact form for your WordPress site. There is very minimal set-up required. Simply install, activate, and then place the short code [cscf-contact-form] on your web page. A standard set of input boxes are provided, these include Email Address, Name, Message and a nice big ‘Send Message’ button. When your user has completed the form an email will be sent to you containing your user’s message. To reply simply click the ‘reply’ button on your email client. The email address used is the one you have set up in WordPress under ‘Settings’ -> ‘General’, so do check this is correct. To help prevent spam all data is scanned can be scanned with Fullworks Anti Spam Pro. For this to work you must have the Fullworks Anti Spam Pro Plugin installed and activated. Fullworks Anti Spam Pro will also log all your messages, categorized as spam or not, automatically. For added piece of mind this plugin also allows you to add a ‘reCAPTCHA’. This adds a picture of a couple of words to the bottom of the contact form. Your user must correctly type the words before the form can be submitted, and in so doing, prove that they are human. Why Choose This Plugin? Granted there are many plugins of this type in existence already. Why use this one in-particular? Here’s why: Minimal setup. Simply activate the plugin and place the shortcode [cscf-contact-form] on any post or page. Safe. All input entered by your user is stripped back to minimise as far as possible the likelihood of any malicious user attempting to inject a script into your website. If the Fullworks Anti Spam Pro plugin is activated all form data will be scanned for spam. You can turn on reCAPTCHA to avoid your form being abused by bots, however Fullworks Anti Spam Pro will do this without reCAPTCHA. Ajax enabled. You have the option to turn on AJAX (client-side) validation and submission which gives your users an immediate response when completing the form without having to wait for the page to refresh. The form can integrate seamlessly into your website. Turn off the plugin’s default css style sheet so that your theme’s style sheet can be used instead. Flexible CSS styling: Choose from Bootstrap, Modern (with dark mode), Theme Native, or Minimal styling modes to match your site’s design. This plugin will only link in its jQuery file where it’s needed, it will not impose itself on every page of your whole site! Works with the latest version of WordPress. Original plugin written by an experienced PHP programmer, Megan Nicholas, the code is rock solid, safe, and rigorously tested as standard practice. Headless WordPress ready. REST API support allows you to submit forms from decoupled frontends, mobile apps, or any external application with proper authentication. Hopefully this plugin will fulfil all your needs. PHP 8 Ready Tested on PHP 8.4 How to Use Unless you want to change messages or add reCAPTCHA to your contact form then this plugin will work out of the box without any additional setup. Important: Check that you have an email address set-up in your WordPress ‘Settings’->’General’ page. This is the address that the plugin will use to send the contents of the contact form. To add the contact form to your WordPress website simply place the shortcode [cscf-contact-form] on the post or page that you wish the form to appear on. If you have Jetpack plugin installed disable the contact form otherwise the wrong form might display. Additional Settings This plugin will work out of the box without any additional setup. You have the option to change the default messages that are displayed to your user and to add reCAPTCHA capabilities. Go to the settings screen for the contact form plugin. You will find a link to the setting screen against the entry of this plugin on the ‘Installed Plugins’ page. Here is a list of things that you can change Message: The message displayed to the user at the top of the contact form. Message Sent Heading: The message heading or title displayed to the user after the message has been sent. Message Sent Content: The message content or body displayed to the user after the message has been sent. CSS Framework: Choose how the form is styled: Bootstrap (Default): Uses Bootstrap CSS classes for full Bootstrap compatibility. Best for themes already using Bootstrap. Modern (Card style): A beautiful, opinionated modern design with card-style layout, large inputs, and CSS variables for easy customization. Includes automatic dark mode support. Theme Native: Uses minimal classes with WordPress’s wp-element-button for the submit button. The form inherits your theme’s native form styles. Minimal: Uses semantic CSS classes only (cscf-field, cscf-input, etc.) for complete custom styling control. Use this plugin’s default stylesheet: The plugin comes with a default style sheet to make the form look nice for your user. Untick this if you want to use your theme’s stylesheet instead. The default stylesheet will simply not be linked in. This option is most relevant when using the Bootstrap CSS framework. Use client side validation (Ajax): When ticked the contact form will be validated and submitted on the client giving your user instant feedback if they have filled the form in incorrectly. If you wish the form to be validated and submitted only to the server then untick this option. Use reCAPTCHA: Tick this option if you wish your form to have a reCAPTCHA box. ReCAPTCHA helps to avoid spam bots using your form by checking that the form filler is actually a real person. To use reCAPTCHA you will need to get a some special keys from google https://www.google.com/recaptcha/admin/create. Once you have your keys enter them into the Public key and Private key boxes reCAPTCHA Public Key: Enter the public key that you obtained from here. reCAPTCHA Private Key: Enter the private key that you obtained from here. reCAPTCHA Theme: Here you can change the reCAPTCHA box theme so that it fits with the style of your website. Recipient Emails: The email address where you would like all messages to be sent. This will default to the email address you have specified under ‘E-Mail Address’ in your WordPress General Settings. If you want your mail sent to a different address then enter it here. You may enter multiple email addresses by clicking the ‘+’ button. Confirm Email Address: Email confirmation is now optional. To force your user to re-type their email address tick ‘Confirm Email Address’. It is recommended that you leave this option on. If you turn this option off your user will only have to enter their email address once, but if they enter it incorrectly you will have no way of getting back to them! Email Subject: This is the email subject that will appear on all messages. If you would like to set it to something different then enter it here. Override ‘From’ Address: If you tick this and then fill in the ‘From Address:’ box then all email will be sent from the given address NOT from the email address given by the form filler. **Option to allow enquiry to email themselves a copy of the message. Contact consent: This option allows you to be GDPR compliant by adding a ‘Consent to contact’ check box at the bottom of the form. Enable REST API: Turn on REST API support to allow headless WordPress implementations to submit forms. Required User Capability: Set the minimum WordPress user capability required to use the REST API (default: edit_posts). REST API for Headless WordPress This plugin includes REST API support, making it perfect for headless WordPress implementations, mobile applications, and decoupled frontend frameworks like React, Vue.js, or Angular. Enabling REST API Go to the plugin settings page Find the “REST API Settings” section Check “Enable REST API” Set the required user capability (default: edit_posts) Save your settings API Endpoint POST /wp-json/cscf/v1/submit Authentication The REST API requires WordPress user authentication. Users must be logged in and have the capability specified in settings (default: edit_posts). For headless implementations, you can use: – Application Passwords (WordPress 5.6+) – JWT Authentication plugins – OAuth plugins – Basic Authentication (development only) Request Format Send a POST request with JSON body: `json { “name”: “John Doe”, “email”: “
[email protected]”, “confirm_email”: “
[email protected]”, “message”: “Your message here”, “phone_number”: “+1234567890”, “contact_consent”: true, “email_sender”: false, “post_id”: 123 } ` Required fields: – name: Sender’s name – email: Sender’s email address – message: The message content Optional fields: – confirm_email: Required if email confirmation is enabled in settings – phone_number: Required if phone number is set as mandatory in settings – contact_consent: Required if contact consent is enabled in settings – email_sender: Set to true to send a copy to the sender – post_id: The ID of the page/post where the form would normally be displayed Response Format Success Response (200): json { "success": true, "message": "Message Sent" } Validation Error Response (400): json { "code": "validation_failed", "message": "Validation failed.", "data": { "status": 400, "errors": { "email": "Please enter a valid email address.", "message": "Please enter a message." } } } Authentication Error Response (401): json { "code": "rest_forbidden", "message": "Authentication required.", "data": { "status": 401 } } Example Implementation JavaScript (fetch API): `javascript const formData = { name: “John Doe”, email: “
[email protected]”, confirm_email: “
[email protected]”, message: “This is a test message from the REST API” }; fetch(‘https://yoursite.com/wp-json/cscf/v1/submit’, { method: ‘POST’, headers: { ‘Content-Type’: ‘application/json’, ‘Authorization’: ‘Bearer YOUR_AUTH_TOKEN’ }, body: JSON.stringify(formData) }) .then(response => response.json()) .then(data => { if (data.success) { console.log(‘Message sent successfully!’); } else { console.error(‘Validation errors:’, data.data.errors); } }); ` Important Notes REST API is disabled by default for security reCAPTCHA is bypassed for REST API submissions (authentication provides security) All other form validations and spam filtering still apply Form submissions via REST API are processed identically to regular submissions Email notifications work the same way as standard form submissions Demo Demo site coming soon.
Top keywords
- form33×1.84%
- email31×1.73%
- message25×1.39%
- api19×1.06%
- address18×1.00%
- rest18×1.00%
- user18×1.00%
- rest api17×0.95%
- recaptcha16×0.89%
- wordpress16×0.89%
- contact15×0.84%
- default12×0.67%
Hash Form – Drag & Drop Form Builder
Hash Form is a free drag and drop form builder for WordPress. Build a form, style it to match your site, and embed it anywhere, with no code and no paywall on the features you actually need. Use it for contact, feedback, survey, registration and quote forms. Drag fields onto a row and column canvas, set the styling, add conditional logic, and publish. The full field set, entry storage, styling and email tools are all in the free plugin, not held back for a paid tier. Forms You Can Build Hash Form is not tied to one type of form. The same canvas and field set cover a two field contact box and a long, multi section application. Contact and enquiry forms: name, email, phone and message, with the built in captcha keeping spam out. Feedback and review forms: star ratings alongside open comments, so you collect a score and the reason behind it. Surveys and questionnaires: radio, checkbox, dropdown, image choice and range slider questions, with conditional logic revealing follow up questions only when they apply. Registration and sign up forms: events, memberships, courses, workshops or a simple newsletter opt in. Quote and estimate requests: number, dropdown and slider fields that size a job properly before you reply to it. Booking and appointment requests: date and time fields for reservations, consultations and callback slots. Job applications: address and date fields with a file upload for a CV, cover letter or portfolio. Support and helpdesk tickets: category dropdowns, priority options and screenshot uploads. File submission forms: collect documents, images or artwork through an upload field limited to the types you allow. Order and request forms: quantity spinners and product choices for made to order, wholesale or catering enquiries. Polls and votes: single choice questions, including image based options. Whatever the form, every submission is stored as an entry on your own site and can be emailed to whoever needs to see it. What You Get Free, and not limited: 27 field types, unlimited forms and unlimited entries, with no upgrade wall on everyday features. A real canvas: arrange fields in rows and columns, not a fixed single column. Full design control: set typography, colour and spacing, then save it as a style template you reuse across forms. Entries kept on your site: every submission is stored and searchable, so a missed email never loses a lead. Embed anywhere: a shortcode, the Gutenberg block, or the Elementor widget. Privacy option: turn off Google font requests so forms do not share visitor data by default. Available Field Types Assemble any form from a full set of drag and drop, fully styleable fields. Name: The Name field provides flexibility for collecting names in various formats, such as Full Name, First Last, Last First, and First Middle Last. Email: The email field type serves the purpose of collecting users’ email addresses, enabling communication for notifications about upcoming events or responding to any inquiries they may have. Website/URL: Add a ‘Website/URL’ field in your contact form for users to share their website addresses, providing context for inquiries and networking. Address: Users can provide their complete address by filling in these fields, offering a comprehensive way to collect location information. This can be particularly useful for various purposes such as event planning, shipping, or personalized communication. Text: The single line text field collects short, free form answers that fit on one line, such as a name, a subject, or a reference number. Text Area: The textarea element is commonly employed in forms to gather user inputs such as comments or reviews. Unlike single line input fields, a text area can accommodate an unlimited number of characters. Checkbox: Checkboxes provide users with the flexibility to choose from a range of options, enabling the easy selection of preferences. This feature helps in distinctly capturing user choices, streamlining the data collection process for enhanced efficiency. Dropdown: In a contact form, a dropdown appears as a compact menu with a default option. Users can click or tap to reveal and choose from a list of options. Radio Buttons: Radio buttons in a contact form are circular elements for selecting a single option from a set. Users can choose only one option, making them ideal for questions with mutually exclusive answers. Image Selector: The Image Selector feature enables you to integrate pictures into your contact forms, serving as visual representations of available options. Users can conveniently choose their preferred selection by interacting with the images provided. Range Slider: A range slider is a UI element with two draggable handles, allowing users to set numeric ranges visually. Widely used in applications for data filtering and preference setting, it offers an intuitive and visually engaging way for users to define their numeric preferences. Star: Gather user ratings with a star based input, perfect for feedback or reviews. Phone: Collect customer contact details with the convenient phone field type, streamlining communication for your online platform. Date and Time: Capture specific dates and times, crucial for scheduling or event related details HTML: Embed custom HTML code, providing flexibility for advanced customization. ReCAPTCHA: ReCAPTCHA holds significant importance in the context of a contact form. It acts as a crucial security layer, discerning between human users and automated bots. By incorporating challenges like distorted characters or image selections, it effectively thwarts spam submissions and safeguards the form from malicious activities. User ID: The User ID field is designed to store the ID number of a logged in user upon form submission. This functionality facilitates the linkage of submitted entries to specific users on your website, enhancing the organization and association of user generated content. Hidden: A hidden field enables web developers to incorporate data that remains unseen and unmodifiable by users during form submission. Typically, a hidden field stores information such as the database record that requires updating upon form submission. Heading: You have the flexibility to select suitable headings for your titles, similar to the formatting options available in WordPress. Choose from a range of heading levels, including H1, H2, H3, H4, H5, and H6. Paragraph: Add descriptive text for instructions or additional information. Separator: A separator is a dividing line in form. Choose styles like solid, double, dotted, dashed, groove, and ridge for customization. Spacer: A spacer is a useful tool for creating gaps between elements in a contact form. It allows you to add space by specifying the number of pixels. Image: The Image section in your contact form enables you to incorporate pictures, providing users with visual context about the content or purpose of the form. Spinner: The Spinner element provides users with an intuitive interface to easily select numeric values by spinning a control mechanism. Number: The Number Field is employed to gather numeric values, encompassing integers, decimals, or percentages. Users are restricted to inputting only numerical data into this field. Upload: This feature allows respondents to effortlessly submit diverse files, enriching data collection with images, documents, or other relevant attachments. Seamlessly integrated into the form, the upload field ensures an intuitive experience, and submitted files can be securely managed for further analysis or processing. Drag and Drop Builder Arrange fields on a row and column canvas, reorder them by dragging, and get a responsive layout without writing code. Design and Style Templates Control typography, colour and spacing down to the detail, then save the result as a style template and apply it to any form so your forms stay consistent across the site. Conditional Logic Show or hide fields based on earlier answers, so each form stays short and relevant to the person filling it in. Entry Management Every submission is saved and listed on an Entries screen. Read answers, star the ones worth following up, search, and trash entries from one place. Email Notifications and Auto Responder Get notified on every submission, and send an automatic reply so visitors know their message arrived. Email Templates Choose from several email templates, add a header image, and send a test email before you go live. Confirmation Messages Show a confirmation message after a submission, or redirect the visitor to any page you choose. Embed Anywhere Add a form with a shortcode, the Gutenberg block, or the Elementor widget, whichever suits how you build. Spam Protection Built in Google reCAPTCHA v2 and v3, with language and, for v3, score threshold settings. Reliable Email Delivery Works with WP Mail SMTP so notifications send over a configured SMTP connection rather than the server’s default mailer. Import and Export Export a form to a file and import it on another site, without rebuilding it. Test It First Try every feature in a live sandbox at the Hash Form test dashboard before you install. Documentation and Support Step by step guides and reference are in the Hash Form documentation. For anything else, our support team is available through support tickets.